About Me

I am a new empty nester, and I love to make cards and ATCs. I am always looking for ways to use the product I have, to learn new techniques and ways to do things, and most of all, to have fun with the creating of my art.

Sunday, February 27, 2011

Weekend Challenge Cards


These are a couple of cards that I made this weekend for a couple of Hero Arts Flickr group challenges.  The top card was a colour challenge, it had a picture of what I think is a reddish yellow cone flower. The closest colours I had were SU's So Saffron cardstock, and Aged Mahogany Distress Ink.  I used a So Saffron card base, and taking the Hero Arts Large Fabric Cling stamp, inked it with the Aged Mahogany ink, and stamped it on the So Saffron cardstock.  Then, I took some Tim Holtz Tissue Tape and inked it with Aged Mahogany ink, then lined it up on the left hand side of the card.  It's hard to see in the scan, but I rounded all four corners with my new Corner Chomper :) ( I really LOVE the corner chomper, IMO it's worth every penny). Taking a length of creamy yellow ribbon, I wrapped it around the card front and attached to the back.  I took the Thank You stamp from the Type clear set and stamped it in Aged Mahogany Distress Ink on the ribbon.


For the second card, I started with a white card base, brown paper, and cream cardstock.  I cut the brown paper 5.25 x 4 inches, and the cream cardstock to 5 x 3.75 inches.  I took Tea Dye Distress Ink, and stamped Silhouette Grass on the cream cardstock.  I rounded all the corners of all the cardstock and paper.  I had some scrap brown ribbon left over in my stash, so I wrapped that around the cream cardstock, then adhered the cream layer to the brown paper layer.  I then adhered that to the white card base.  I took some scrap cream cardstock, and rounded the corners.  Using the "Hugs" stamp from the Hero Arts Type clear set, I stamped it in Walnut Stain Distress Ink.  I punched a hole in the cream scrap, and used some cream yarn to  tie it onto the brown ribbon.  To keep the Hugs from moving, I used a small piece of foam tape to stick the back of the cardstock and stuck it to the cream layer.

Saturday, February 26, 2011

Valentine's Mingle Cards


These are a couple of cards that I did for Valentine's mingles this year.  The top card was for a local mingle, so I did a 6 x 6 card.  I started with some Die Cuts with a View cardstock from the Luxury Pack, and cut it to 12 x 6, then scored it so it was a 6 x 6 card.  I then took a 5.5 inch square of white cardstock and stamped the Hero Arts Friend Definition stamp on it.  I took a 1.5 inch  x 5.5 inch piece of cardstock from DCWV The Four Seasons pack, and edged it with a Martha Stewart Doily punch.   I added some scrap white lace underneath  the punched piece, and foam mounted it to the right hand side of the white cardstock.  I then adhered the white layer to the base cardstock.  I took a Tim Holtz Rosette and double foam mounted it to the top right hand corner of the white layer of cardstock.  Then, using a scrap piece of white cardstock, I sponged Spun Sugar Distress Ink along the edges in a bit, then over stamped with the small flourish heart from Quietfire Designs. in Worn Lipstick Distress Ink. I added the sentiments (Hero Arts and Studio G), in Barn Door Red.  There was still a lot of white space, so I used the MS Doily punch again and punch the bottom edge of the cardstock.  I adhered the sentiments to the white layer of cardstock.

For the second card, I started with black as my card base.  I took a 1.75 by 4.75 piece of white cardstock, and used the retired SU Wrought Iron corner punch to punch a corner.  I used some patterned paper, and rounded the two right hand side corners.  Using scrap white cardstock, I used the Stitched Heart stamp from Hero Arts, and stamped the heart twice in Victorian Velvet Distress Ink, and cut out.   With one heart, I stamped the squirrel and partial sentiment in Versafine Black, showing the stitched lines ( Stamps are Hero Arts).  I flipped the other heart over, and trimmed to the second heart, so it was a bit smaller.  I used an Autumn Leaves Alpha set and stamped the U in Versafine black.  I then adhered the white punched corner piece to the patterned paper, and adhered to the base cardstock. I coloured the squirrel in with a marker, then used SU's Crystal Effects to make him glossy.  Once that dried, I stuck the heart with the U on the bottom towards the right hand corner, then foam mounted the squirrel on top of that.  To finish the card, I added some gems.

One Sheet Wonder Card Set 02


This is the second set of 16 One Sheet Wonder cards that I did from Jessica Taylor's blog HERE.  This time I used all SU cardstock and patterned paper.  I did mess up the cutting of the paper this time, so I had to improvise.  I am still very pleased with the results.  This time, instead of leaving a lot of white space on the card, I used Versamark ink and stamped some backgrounds on to the cards.  And I used a 2.5 and 3 inch circle punches to do the layering.    All stamps are Hero Arts,  ink is Distress ink ( Worn Lipstick and Walnut stain) as well as the Versamark, and the punches are from Marvy.  Sine February was Love and Friendship month at the Hero Arts blog, I entered these cards in there.

I am liking this particular One Sheet Wonder so much that I am going to do one set in Christmas, for a Christmas card challenge :D

One Sheet Wonder Cards Set 01


These are some of the cards that I made using Jessica Taylor's One Sheet Wonder HERE.  I made 16 cards, and I am very pleased with them.. rather than doing a bunch of different themes, I used two images and two sentiments, and made 8 cards of each.  So I ended up with 8 sympathy cards and 8 birthday cards.  I  found that it took me, from beginning to end, having done NOTHING to prep for it, just over 3 hours.  A lot of that was the cutting and scoring.. being that I double and triple checked before I cut :)  The base cardstock is SU Cool Caribbean,  the navy is from the printer's shop, as is the white Neenah cardstock, the patterned paper I believe was some Collage Press. All the stamps, minus the sympathy sentiment are Hero Arts.

Friday, February 18, 2011

Hero Arts and Basic Grey Giveaway!!

Kelly Goree is a Basic Grey artist, who was asked by Jennifer McGuire of Hero Arts to do a project with the new Basic Grey Stamps/ patterned paper that Basic Grey  has done with Hero Arts.  It's on the Hero Arts blog today (Feb 18th).  Kelly is generous enough to give away some Basic Grey Paper with some coordinating Hero Arts stamps.  Go HERE to enter.

Monday, February 14, 2011

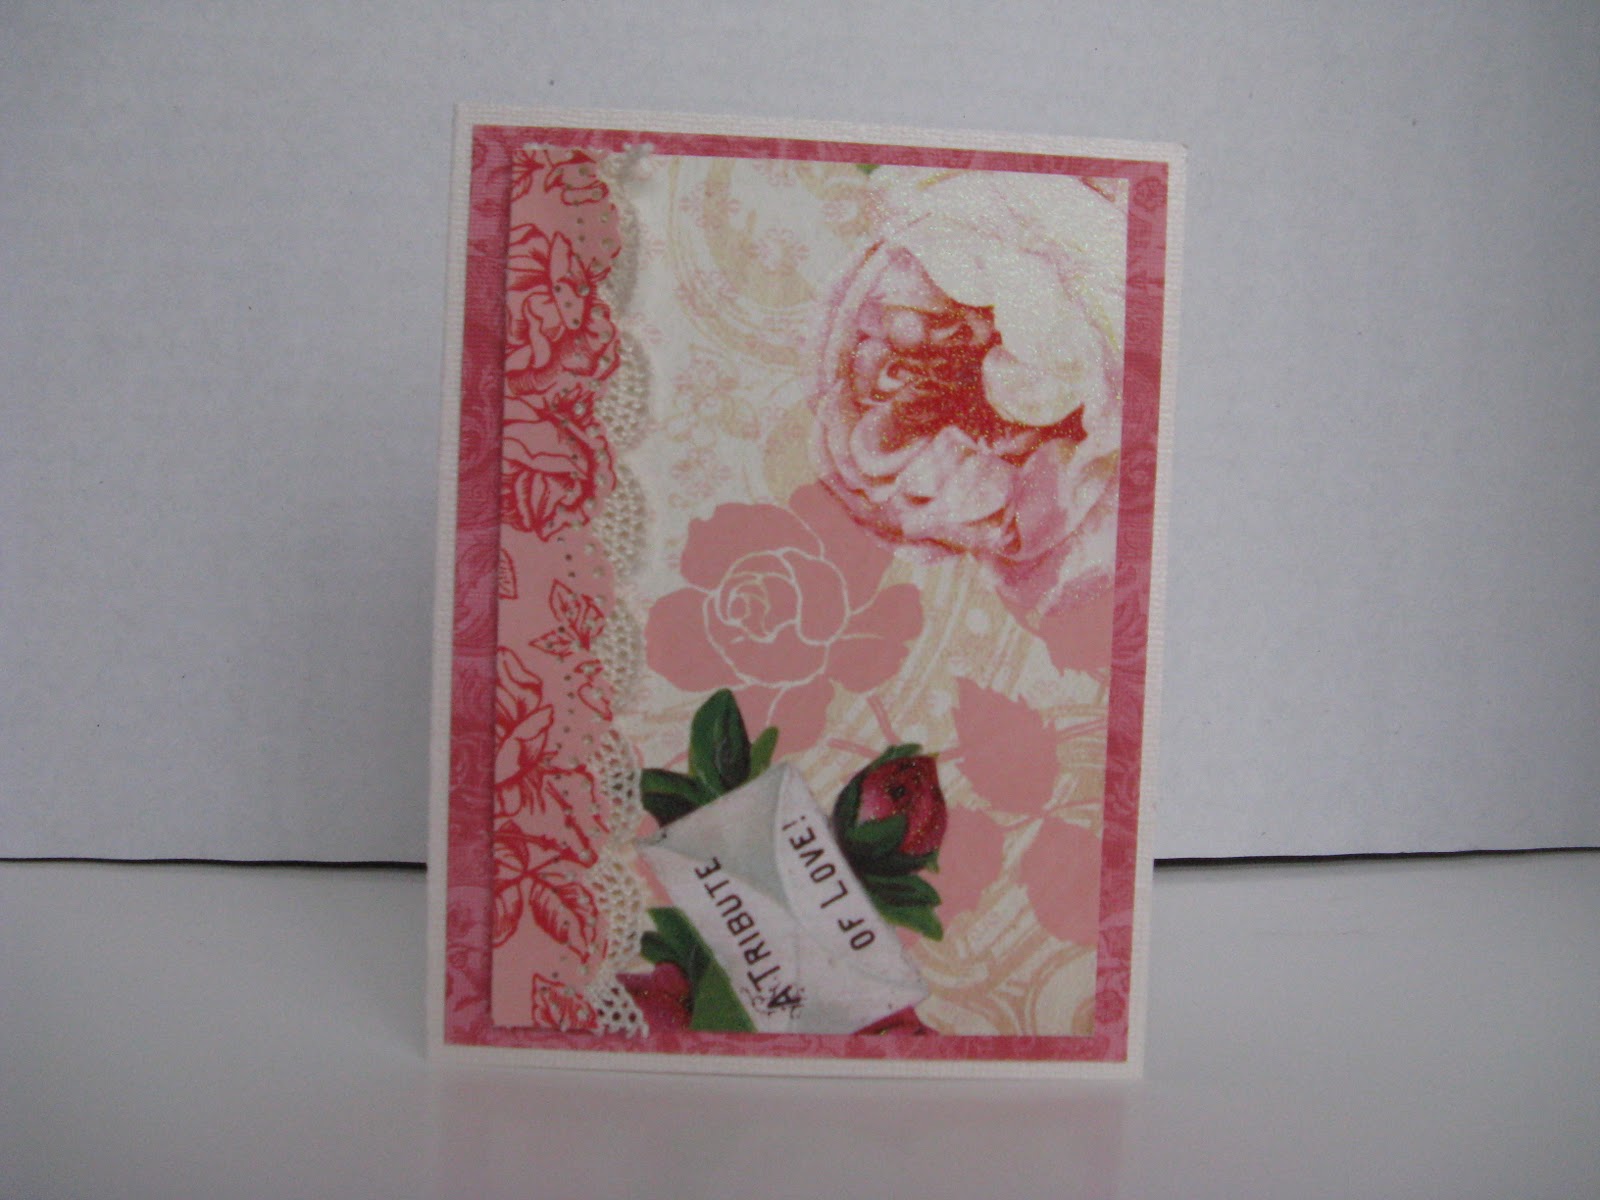
A Tribute to Love

This card is another card I did with the DCWV scrapbook paper that was so romantic.  This time, I took a 3 3/4 x 5 piece that had a rose, and an envelope that says "A Tribute to Love" on it.  I took a 1 x 5 inch piece of coordinating patterned paper, and used the MS doily edge punch to punch the edge.  I also added some cream lace below the punched paper.  I then layered it on the a slightly bigger coordinating paper, then I layered it onto cream bling cardstock.

Thursday, February 10, 2011

Challenge Cards


These cards fulfill a couple of challenges.. one is the Queen of Hearts challenge that Suzanne at Quietfire is doing.  The other is the photo inspired  challenge HERE.  I took some DCWV scrapbook paper, and had a lot of fun with it.  On the top card, I used a Quietfire flourish heart and randomly stamped it all over some white cardstock. in Worn Lipstick Distress Ink.  I then went over the whole piece with Spun Sugar Distress Ink.  I then did the edging of the white cardstock in Barn Door Distress Ink.  I took the two doves and cut them out, cutting as close as I could.  I then added some vintage looking cream lace to the bottom right hand side of the heart, and attached both to the white cardstock.  I then used Barn Door Distress Ink and stamped the sentiment (Hero Arts).  To finish the card, I layered it on to dark green cardstock.

The second card uses another piece of the same paper.  I took a 3/3/4 x 5 piece of the scrapbook paper, and cut out the envelope that says "To the Keeper of my Heart".  I took a paper doily and and rubbed Barn Door Distress Ink on it. I cut the doily to fit in behind the cut out piece of scrapbook paper.  I then foam mounted the envelope on to the card.  To finish the card, I added the large flourish heart from Quietfire Designs, and I also added a key that I had gotten from a collage kit years ago.

A Stampin Up Class - Masculine cards


These cards were done in a Stampin Up masculine card class on January 22.  Yes, I know, I have just now gotten them photographed and uploaded the cards.  Sue M did the class.  The bottom card we did first, and I was told that it was a challenging card... I didn't find it challenging, just a bit fussy and time consuming, but I LOVE the results.  I did learn a bit about colouring as well, which helped, since I don't colour well at all.  The top card was the second card I made, and it was a much easier card, but I still like the results.  I must admit, I am not huge on twine on cards, but I like the twine that is on the green and cream card.  The top card went to my father in law for his birthday this week :)

Thursday, February 3, 2011

Vera's Giveaway!!

Vera is doing a giveaway of Basic Grey papers HERE.  Leave a comment for a chance to win!

Tuesday, February 1, 2011

February's Christmas Card Challenge

This is Norma's entry for the ornament challenge.  She's used ornament patterned paper, the SU ornament punch, a MS punch, and gems for the card.
For February, the challenge to make cards using pink and ribbon.  The whole card doesn't have to be pink, there just needs to be some pink on the card, as well as some ribbon.  Here are my cards:

I used a grey cardstock for the base. I added some pink glitter cardstock and left a 1/4 inch edge around the card.  I stamped an Inkadinkado stamp (I think it's called Angels and Crowns) in black ink on pink cardstock, which I then punched out using a 3 inch circle punch.  I added some sheer pink ribbon to the lower 1/3 of the glitter cardstock, and layered the circle on top.

What will you do for the pink and ribbon challenge?

Wednesday, January 26, 2011

ATCs!!


These are some ATCs that I did for a vintage collage swap.. when I'm in the mood, I try and get several months worth done at a time, and then I mail them off to the hostess.  Funny thing is, Blogger put them in reverse order.. The snow ATC is for January, the love for February, and the friend for March :)

And since January 31st is the middle day between mine and hubby's birthday, I am going to give away some blog candy!!  Just leave a comment about the most romantic thing your hubby/ SO has done for you, and I'll draw the night of January 31st.  You have until 6pm Pacific on the 31st to leave your comment.  I don't have a picture of the candy, but it's lots of neat small stuff:)

Tuesday, January 18, 2011

Kathy's Giveaway!!

Kathy is having a Penny Black giveaway on her blog!!!! Click on the title to get to her post. :)

Friday, January 7, 2011

Joy's Blog Anniversary and Blog Candy Giveaway!

Joy at Less is More is celebrating her 1st anniversary  as a blogger!!! She is giving away some cool stuff as seen above.  Just click on the title of the this blog post, and you should be linked to Joy's post.  Check out her art, it's fabulous!

Wednesday, January 5, 2011

New Blog Look

Well, something went haywire, and I lost my flower background.. so I have been playing around this morning on my blog.  I am quite liking what I have on there for now.... and I am one of those people who HATE to change their colour schemes and images on the blog.  It annoys me, and the fact that my HTML got corrupted didn't help my mood much.. oh well, c'est la vie.

I went to the local stamping group yesterday and made 22 cards... all Christmas cards.. they were designs I had in my head for last years Christmas cards, but I never got them done, so I did them now while they were still fresh in my head.  Some are going to be for my challenge in February :)   Now I get to stamp at a friend's house on Friday, and it's Birthday card time.  I have several birthday cards to make, including a couple of masculine ones.  Should be a fun time.

Saturday, January 1, 2011

January 2011 Christmas Card Challenge

Well, it's January 1st.... I hope everyone is doing fine.  We had a nice quiet New Years Eve, which is the way we like it.   Since it is the 1st of the month, I have the first Christmas card challenge here for you..... "What!?" you say.... "Christmas cards already? We just got OVER Christmas!!"  Well, yes, Christmas is just past, but if you're like me, you were still making cards, since the demand for your cards went way up this last year.  I had aimed to make about 60 for myself.. then my kids, sister in law and friend wanted some...... that added probably another 60 - 70 cards to the mix!  So, I think if I start early, and get 10 cards a month done, I'll be set by November.  That's the game plan.. and that's not counting birthday, anniversary and other cards I need to make throughout the year. 


This month's challenge is simple: Ornaments.. this means that you need to have at least 1 ornament on your card. It doesn't have to be the focal point of your card, but it needs to be on there.  You need to make at least 4 cards.  Since I am aiming for 10 cards a month, I will have to make more then the 5 I have.  Here is my sample:

I used very little stamping on this card.  I used the Spell Binders  Heirloom Ornament dies in three sizes on some Christmas paper, and layered them.  I then took a strip of Christmas paper ( K&Company) and added it to the left side of some Bazzil Bling cardstock in Pearl.  To the strip of paper I added a strip of Tim Holtz Tissue Tape in Symphony... since then I've learned from Tim himself that you can use Distress and Alcohol inks to colour the tissue tape... I am SO going to try that later. :D
Once the tissue tape was on, I adhered my ornament, then used a HA sentiment in Fired Brick Distress Ink on the bottom right hand corner. I am very happy how this card turned out.

Monday, December 20, 2010

Blog Candy Winner and More Christmas Cards

Sorry that the draw didn't get done yesterday, between the really far away child and football, I  forgot to do the draw.. and every time I thought of it, I couldn't do it.  I went to random.org to  pick a winner.....and, the winner of the surprise candy is judy!  Judy, please email me HERE and I will get your package off to you!

So about a week and a half ago, a friend called, and asked if I could make about a dozen cards for the next day... YIKES!!! I said sure, it might take me a bit into Friday to get them done... so I used the same sketch ( I believe it's a Clean and Simple sketch) and just changed the cardstock, ink, stamps and paper.  I am very happy with how they turned out.


Where do I start? The top card is white striped cardstock, with some K&Company paper on the side.  The poinsettia is SU, and the sentiment is Digital Princess Designs. The blue card is navy cardstock, a Hero Arts sentiment and ornament, and Heidi Grace snowflake paper.  The Kraft cardstock base has some unknown paper, a Quietfire Design stamp for the mittens, and Hero Arts for the sentiment.  The pink, grey and black card has unknown paper, SU Snowflake, and a Hero Arts sentiment.  All of the bling is from the local dollar store.  I used Black Versafine ink, and Distress inks for stamping with.  I ended up on a roll, and in total, I made 29 cards in one day!!! I had to finish the insides  the next day, I was too tired from all this stamping and creating to stamp the inside sentiment properly.

Tuesday, December 14, 2010

Blog Candy!!

OK, I have hit 100 posts since I started blogging.... so, it's time for some blog candy!!  All you have to do is say what you are most thankful for this Christmas / holiday season, and your favourite Christmas family tradition.  I will randomly choose someone on the 19th of December.   Unfortunately, I can only send to Canada and the USA.  And it's a surprise, so no pictures of the candy. 
Merry Christmas!!


Here are some more tags.  With the kraft tags, I was inspired by Vera Rhuay and her kraft tags (top photo),  so I made some kraft tags myself... All stamps are Hero Arts.  I cut the kraft tags out with a punch, then used either the Friend Definition or Musical Background stamp. I then used the Ornament and star from Swirl Christmas , stamped and cut them out, then layered them on punched out circles of patterned paper.

The snowmen tags I did on shipping #5 tags, with Vintage Sepia ink, and Hero Arts stamps.  I stamped the snowman on the tag, and on scrap cream cardstock, coloured, and cut out the snowman on the scrap cardstock.  I then masked the snowman and over stamped in Friend Definition ( vertical tag) and Musical Background ( horizontal tag).  With the vertical tag, I just added a couple of punched circles with the Hero Arts sentiment "Wishes of Joy". and foam mounted it on the tag.  With the musical background snowman, I  hand cut a banner and stamped "fa la la la la" and taped it to the snowman, using foam tape for the far end of the banner for dimension.  I then  foam mounted the second snowman over the first snowman.

Wednesday, December 8, 2010

Hero Arts Blog Hop!

Hero Arts is having their 2011 catalogue blog hop on Friday!!  Wake up early, have a coffee (or tea) and work your way through all the blogs, and you can win some fab prizes... all from the new catalogue, of course :D  you can get to the the Hero Arts blog by clicking on the title.

Thursday, December 2, 2010

More Christmas Tags!


 For the birds, I did the musical background for the background image, then I stamped the dove from Merry Christmas Trees twice, once on to the tag itself, the other on to scrap distressed cardstock. I cut out the doves on the scrap cardstock, I cut two strips of the distressed cardstock, and trimmed one edge to look like a banner. I stamped Happy Holidays (HA) on it, then taped, and foam mounted the end of the banner. The cut out dove I foam mounted over top of the stamped dove.

The middle two tags were done in Distress inks as well.  I used Merry Christmas trees to stamp the trees, then stamped Season's Greetings at the bottom of the tag.  For the reindeer, I used the reindeer from Swirl Christmas, stamped on a musical background distressed tag, distressed a scalloped oval tag, and stamped Merry Christmas on it, and foam mounted the sentiment.

For the trees,. I distressed a #5 shipping tag, stamped Friend Definition on the tag.  I then stamped the Sparkle Tree on the tag.  I took some scrap distressed cardstock, punched out the circles, then stamped the sentiments, and foam mounted them for the base of the tree.